Exhibition Stands
Trade shows place brands side-by-side, often in busy halls where first impressions arrive in seconds.Read More
-
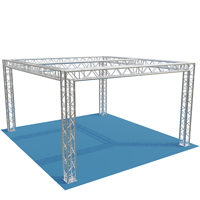
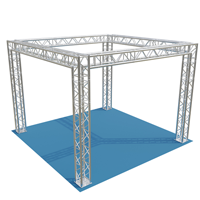
 In stockBeamZ P30 Quad Truss Exhibition Stand, 4.5m 4.5m 2.5m with Centre Beam£5,839.99
- Large 4.5m x 4.5m footprint optimised for exhibition layouts
- 2.5m height provides standout visibility for displays and signage
- Includes centre beam for additional support and design versatility
- Constructed from durable 50mm aluminium quad truss
- Designed as a fully portable exhibition stand system
In stockIn stock -
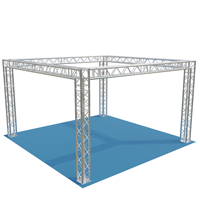
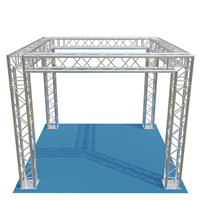
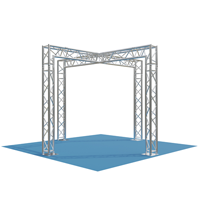
 In stockBeamZ P30 Quad Truss Exhibition Stand - L3m W3m H 2.71m£3,580.00
- Quad truss structure ensures stability and easy configuration
- Freestanding portable exhibition stand with compact 3x3m footprint
- Quick assembly with precise connections and all fittings supplied
- Ideal for exhibition truss and display installations
- Durable 50mm aluminium design delivers reliability for Exhibition Stands
In stockIn stock -
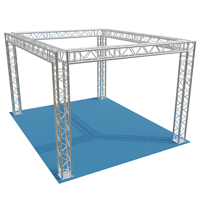
 In stockBeamZ P30 Quad Truss Exhibition Stand, 6.5m 6.5m 3m with Centre Beam£7,219.99
- Large 6.5m x 6.5m x 3m design for bold exhibition presence
- Sturdy 50mm aluminium quad truss system ensures safety
- Integrated centre beam adds versatility for hanging displays
- Modular parts allow for portable exhibition stand setup
- Complete exhibition truss system, ready for quick builds
In stockIn stock -
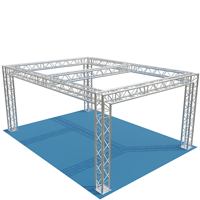
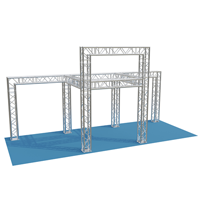
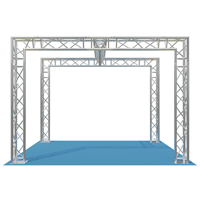
 In stockBeamZ P30 Quad Truss Exhibition Stand - L6m W3.21m H3m H Shape£4,579.99
- Quad truss construction offers easy assembly and sturdy construction
- Complete portable exhibition stand with all fittings included
- Custom H-shape layout ideal for exhibition truss needs
- Large coverage: L6m x W3.21m x H3m
- Engineered for continuous use, perfect among Exhibition Stands
In stockIn stock -
 In stockBeamZ P30 Quad Truss Exhibition Stand - L4.5m W4.5m H3m£6,019.99
- Large-scale display framework with 4.5m x 4.5m rectangular footprint
- 50mm quad truss system ensures impressive visual strength
- Complete portable exhibition stand with all connecting fittings
- Quick set-up for exhibition truss applications and events
- Reliable solution for temporary structures and display zones
In stockIn stock -
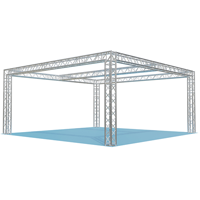
 In stockBeamZ P30 Quad Truss Exhibition Stand - L6 W6 H4 P30£10,859.99
- Extra-large 6m x 6m x 4m footprint for ambitious showcases
- Strong 50mm aluminium quad truss framework ensures stability
- Versatile design ideal for temporary structures & exhibition stands
- Comprehensive kit includes all truss and connectors
- Suitable for retail, trade, and display environments
In stockIn stock -
 In stockBeamZ P30 Quad Truss Exhibition Stand - L5m W5.5m H3m with Centre Beam£6,599.99
- Large-scale floor support system made from durable quad truss
- 5.5m x 5m modular footprint for adaptable display presentations
- 3m height structure allows branding visibility across venues
- Integral centre beam adds strength and rigging versatility
- Complete portable exhibition stand with all fittings supplied
In stockIn stock -
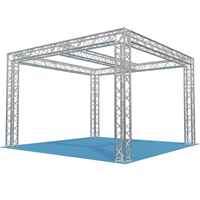
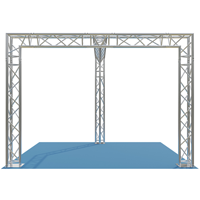
 In stockBeamZ P30 Quad Truss Exhibition Stand - L5m W5m H3m£4,789.99
- Spacious 5m x 5m x 3m structure ideal for events and trade shows
- Constructed from 50mm aluminium quad truss for stability
- Quick to assemble and disassemble portable exhibition stand
- All required fittings included for a complete exhibition truss system
- Designed for professional Exhibition Stands and display use
In stockIn stock -
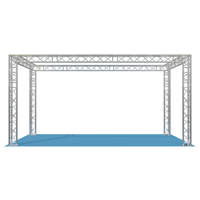
 In stockBeamZ P30 Quad Truss Exhibition Stand - L5m W4m H3m£4,639.99
- Complete quad truss structure for fast venue assembly
- Versatile portable exhibition stand for trade events
- Strong 50mm aluminium truss creates a stable display space
- Flexible design, suits various exhibition display configurations
- Comprehensive kit includes all connectors and fittings
In stockIn stock -
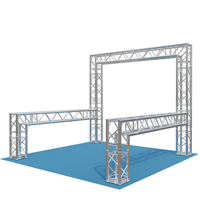
 In stockBeamZ P30 Quad Truss Exhibition Stand, 4m 5.5m 2.5m with Centre Beam£5,749.99
- Rectangular quad truss system for versatile displays
- Integrated centre beam ensures support and layout flexibility
- Large footprint: 5.5m x 4m x 2.5m for wider exhibition coverage
- Complete portable exhibition stand, quick assembly with all fittings
- Highly adaptable exhibition truss design for repetitive professional use
In stockIn stock -
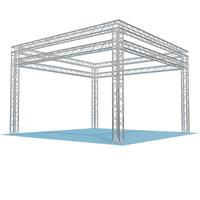
 In stockBeamZ P30 Quad Truss Exhibition Stand - L4m W4m H3m£4,489.99
- Strong quad truss frame: Durable aluminium for lasting performance
- Large interior: 4m x 4m area, 3m height for varied display styles
- Quick assembly: All exhibition truss fixings included for secure setup
- Fully integrated portable exhibition stand: Ideal for frequent events
- Designed for versatile Exhibition Stands and show displays
In stockIn stock -
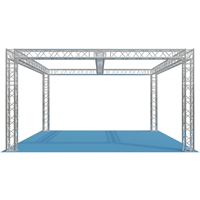
 In stockBeamZ P30 Quad Truss Exhibition Stand - L3m W3m H3m£4,069.99
- Durable aluminium quad truss frame, ideal for repeated use
- Full 3m x 3m x 3m portable exhibition stand for trade events
- Quick-connect exhibition truss fittings for straightforward assembly
- Optimal for branding, display equipment, and custom lighting
- Package includes all hardware for a secure, stable structure
In stockIn stock -
 In stockBeamZ P30 Quad Truss Exhibition Stand - L3m W3m H2.5m£3,889.99
- Ready-to-use portable exhibition stand solution
- Durable 50mm aluminium quad truss construction
- Modular square design for adaptable event setups
- Includes all hardware for straightforward on-site assembly
- Ideal for trade shows, exhibitions, branding and displays
In stockIn stock -
 In stockBeamZ P30 Quad Truss Exhibition Stand - L6.9m W2m H3.7m£6,400.00
- Sturdy 50mm aluminium construction for reliable event use
- Impressive dimensions: 6.9m length, 2m width, 3.7m height
- Modular design for straightforward assembly and disassembly
- Complete portable exhibition stand package, no extra parts needed
- Ideal for exhibitions, trade shows and display environments
In stockIn stock -
 In stockBeamZ P33 Triangle Truss Exhibition Stand - L6m W3m H3m£3,739.99
- Large rectangular triangle truss frame for prominent presentations
- Durable aluminium construction in a portable exhibition stand format
- Seamless modular assembly using 50mm exhibition truss system
- Optimised for trade shows, conferences, and professional displays
- All essential fittings supplied for rapid, secure installation
In stockIn stock -
 In stockBeamZ P33 Triangle Truss Exhibition Stand - L2.7m W2.7m H2.5m£2,429.99
- Durable aluminium construction offers long-lasting reliability
- Integrated square layout for efficient exhibition space planning
- Quick assembly and dismantling for transport and storage
- 50mm diameter triangle truss ensures strong support capacity
- Versatile connections compatible with event exhibition stands needs
In stockIn stock -
 In stockBeamZ P33 Triangle Truss Exhibition Stand - L3m W3.1m H2.5m£2,869.99
- Self-supporting triangle truss frame with 3.1m x 3m footprint
- Quick to assemble and dismantle for true portable exhibition stand use
- Strong 50mm tubing ideal for lighting, banners, and displays
- All required connectors and fittings included for a setup
- 2.5m tall structure designed for visibility at events and trade shows
In stockIn stock -
 In stockBeamZ P33 Triangle Truss Exhibition Stand - L3.1m W3.2m H2.5m£1,960.00
- Strong 50mm triangle truss structure for stable displays
- Completely portable, suits fast installation needs
- All-in-one portable exhibition stand with pre-matched components
- Versatile system for trade shows, retail and event branding
- Streamlined assembly with all fittings included in the kit
In stockIn stock -
 In stockBeamZ P30 Quad Truss Exhibition Stand, 5.5m 5.5m 3m with Centre Beam£6,730.00
- Freestanding portable exhibition stand suits 5.5m x 5.5m spaces
- Centre beam configuration allows clear sightlines and versatility
- Crafted from 50mm aluminium quad truss for durability
- All components and fittings included for rapid assembly
- Ideal choice for Exhibition Stands and display systems
In stockIn stock -